找回密码
 立即注册
搜索
热搜: 活动 交友 discuz
查看: 15097|回复: 3

[Sharing /User Voice] Size down, Performance up - Report on Trial of TS100 Mini-soldering Iron

[复制链接]

195

主题

1333

回帖

3006

积分

管理员

积分
3006

社区居民忠实会员

发表于 2016-1-12 11:14:34 | 显示全部楼层 |阅读模式
a1.jpg

What’s in the Box
a2.jpg
a3.jpg


The product is covered in a cardboard box whichslightly deforms under the pressure of external power adaptor and connector.The box does not look pretty. Though tech-otaku won’t care too much about itslook, we suggest however, the integral set of products should be covered in anice-looking gift box, leaving a good first impression on the users

a4.jpg
a5.jpg
Themain parts of the soldering iron are stored in a much prettier box, black andpush-pull, with a product icon on either side of the surface, and a tag on theback side showing the model number-TS100. I prepare some easy-to-use commoncomponents and parts such as capacitors, resistors, wirewound resistors andlight-emitting diodes for the following test of the soldering performance.

a6.jpg
a7.jpg
a8.jpg
a9.jpg


Unpackthe box we can find this mini-soldering iron. My first impression is, comparedto the traditional soldering irons, this one truly looks compact. Further, itcould be separated into the handle, and the tip which could be furtherseparated into the connector and the heating end. What a brilliant design!Apart from the main products in the box, there are a plastic bag of accessoriesincluding one L-shaped hex key and two spare screws, and a user manual coveringdetailed information of interfaces, buttons, ways of operation, safetyprecaution, common problems, etc. I suggest a close reading before operation toavoid misuse of the device or the riskof scald.


Main Parameters
Model Number: TS100
Power: 65W
Temperature Control Range: 100°C ~ 400°C
Default Working Temperature: 300°C
Default Sleeping Temperature in DefaultSettings: 200°C
Input Voltage: 12~24V
The soldering iron is designed with a blackhandle, revealing a sense of science and technology in its visual effect. Thetexture of its surface touches desirable, preventing the handle from slippingoff one’s hand during operation. In terms of features, the soldering iron ischaracterized by rapid temperature rise and easy temperature control. Thanks tothe rated power of 65W, TS100 takes only 10 seconds to raise temperature from30°C to 300°C  in apower-on context. And the temperature figures will be distinctly shown on thescreen of the handle. Now let’s go to details of the device.


回复

使用道具 举报

195

主题

1333

回帖

3006

积分

管理员

积分
3006

社区居民忠实会员

 楼主| 发表于 2016-1-12 11:27:14 | 显示全部楼层
Details
b1.jpg

The handle has two physical buttons. Let’s callthem button A and button B from left to right. Button A serves as a switch fortemperature to work when the soldering iron is connected to the power supply.Long press button A, the temperature reads on the screen will be in theflashing mode. Now press B to raise temperature or A to reduce it. Eachstandard rise or fall spans 10°C.It is easy to adjust the temperature to particular melting point of solderwire.


b2.jpg


Thisscreen, as I mentioned, is an OLED display that offers a clear picture of thesoldering iron’s working condition and actual temperature. It was hard tocapture all the information on the screen because they kept flashing while Iwas taking a photo. So I guess I have to pass the info-demonstration part. Bythe way, the font color on the screen is white.


b3.jpg


Theheating stick at the front part of the soldering iron is a modest design. Itonly consists of the tip and the middle part. It conveys heat to the metalsurface through thermal conduction. The slim end bridging the heating stick andthe handle is not in the heating area. This part doesn’t feel very hot. Itcould reduce the risk of a scald when the soldering iron is at work.


b4.jpg


Therear part of the handle has a USB port and an interface for an external powersupply. You may wonder what the USB port is used for. It is for firmwareupgrade. We could download the latest firmware for the soldering iron from theInternet. Press and hold button A while connecting TS100 with a computerthrough a USB cable. Enter DFU mode and copy the downloaded files into thevirtual disk. Then the upgrade is done.


b5.jpg


Itis easy to change the working environment if the power input interface connectsthe wide-amplitude DC power supply. Because the soldering iron itself is miniin size and can separate itself from the power adaptor. Such features make iteasy to carry.


b6.jpg


Atthe lower left quarter of the soldering iron there is a model number-TS 100. Inaddition, the surface of the handle is tagged with the working voltage rangingfrom DC12~24V in silver grey color.


b7.jpg


Ihave the habit of looking deep into a new product by dissembling it. So I takethis opportunity to show you how the PCB is structured inside. Put simply, thePCB has a temperature-control relay similar to SSR that can instantaneouslypower the heating stick up/down. Through the PID controller, the temperaturecould be kept constant. Another key part is the conversion of digital value andanalog quantity, turning the temperature value into final digit for easyreading and modification.


回复

使用道具 举报

195

主题

1333

回帖

3006

积分

管理员

积分
3006

社区居民忠实会员

 楼主| 发表于 2016-1-12 11:37:22 | 显示全部楼层
Comparison

c1.jpg

Now I am comparing TS100 with a traditionalmodel. The objective of the comparison, however, is not to judge which one isbetter. After all, prices vary from models. And satisfaction varies from habits.The comparison here chiefly serves to give a more detailed picture of TS100’shighlights.


c2.jpg


Forstarters, let’s look at both handles. The FX-600 in my hand regulatestemperature through a knob. Its adjustable range is between 200°C to 500°C. Its cap temperature is relatively high ascompared to 400°C of TS100°C. But it does not display temperature. Thetemperature regulation extent is 50°C, not so precise as compared to that of TS100.Its working condition can only be judged by a blue LED light.


c3.jpg


Interms of the connection between the handle and the power cable, FX-600 isintegrated with the power cable. It works with direct connection to a 220Vpower supply. In contrast, TS100 works on a DC power and its power adaptor isremovable. So TS100 is more portable.

c4.jpg


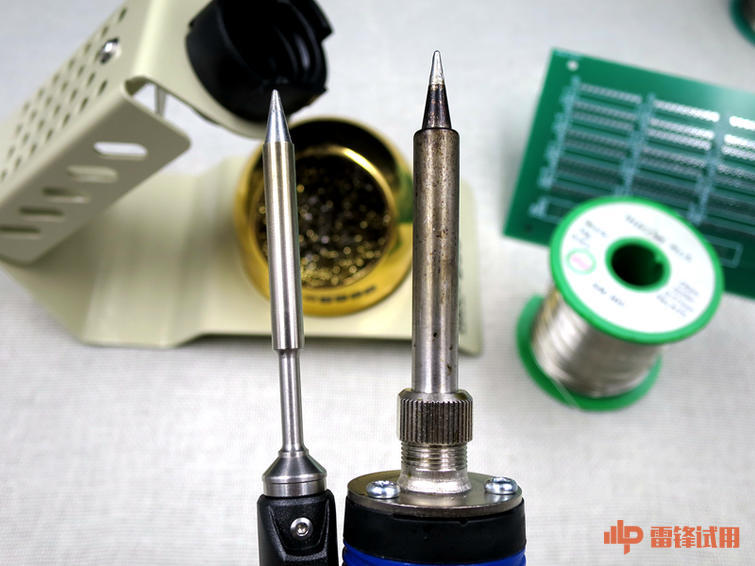
Bothheating elements are of the same materials. FX-600 looks distinctly thicker.Its low-temperature reserve area is not so large as that of TS100. However,during operation, I found FX-600’s range of melted solder at the tip is relativelylarge as compared to that of TS100.


c5.jpg


Thereis a difference between the interfaces of both heating plates. For TS100 theconnection is inseparable, while for FX-600, disconnecting the external metalfrom the internal heating plate is available by loosening the screw cap. Moredetails can be found from the following pictures. In other words, FX-600 allowsan easier replacement of the external plate (some users like pointed cant metaltip).


c6.jpg


Asfor the feeling of touch and the means of holding, they vary from individualhabit. I am used to a relatively thick handle. So I do feel uncomfortable withholding TS100 that has a thinner handle. In terms of flexibility, however,TS100 is way better, especially for soldering blind spots on some circuitboards or micro-electronic components and parts.


c7.jpg


Incomparison of the control circuit board, TS100’s looks obviously more organizedand advanced. On the circuit board of FX-600, there are even a couple ofexposed wires. Nonetheless, both soldering irons work on similar principles oftemperature control. From here it can be seen how the heating plate differsfrom the external metal as I mentioned above.


Soldering

c8.jpg

Following the introduction to details ofappearance and ways of operation, official trial begins. With some of myelectronic components and parts at hand soldered on the PCB, I will give you adetailed picture of the shapes and forms of the soldered points, the meltingsituation on the solder plate, and the easy operation of the soldering iron.


c9.jpg


Asoldering iron is generally held by the right hand at a 45-degree angle. Holdthe solder wires by left hand and warm up the solder plate. Then contact thetip with the solder wires. When the solder on the pin of the electroniccomponents/parts become shaped like a triangular pyramid, swiftly remove thesoldering iron in case long-time contact leads to damage of the solder plate.


c10.jpg


Theway of operating a soldering iron varies from person to person. I think, aslong as you can minimize the risk of a scald and can do a good soldering inwhich the soldered point is pretty and strong, there is no need to do it on standardcodes. In my case, I need to solder a great number of circuit boards every day.Sometimes for the sake of efficiency, I prefer taking a shortcut.


c11.jpg

c12.jpg


Theblue tool in the picture is a desoldering gun used for removal of solder from acircuit board. First, melt a little bit of solder at the tip of the solderingiron. Then melt the soldered point in need of removal. At the same time,desolder it. Please be careful. During operation of the soldering iron, DO NOT place a piece of cotton textile beneaththe PCB like I did. I did so only for the purpose of a photograph. A standardrule is to place a metal plate or a glass board beneath it to avoid thesplashing of the melted solder. And it is advisable to use a smoke-removaldevice because the smoke produced from the melting of solder will do great harmto a human body.

c13.jpg


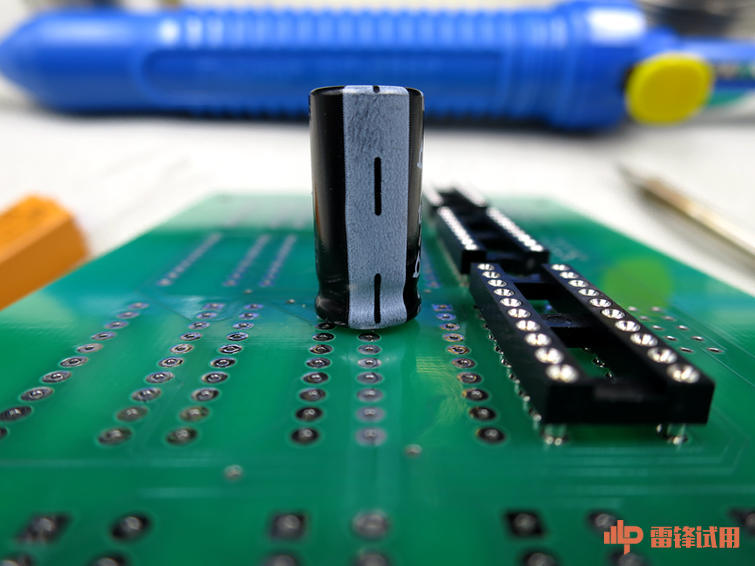
Whenthe soldering is done, turn over the circuit board and it can be seen that thecapacitor and the base board surface is in good contact. There isn’t a serious gap.It is not uncommon that the electronic components/parts with pins such asresistors and capacitors will slip off during the soldering process, contributingto a large gap between the components/parts and the base board. To avoid theproblem above, my advice is, use one hand to support the components/parts andstick a little solder to the tip, then slightly solder one of the pins for thepurpose of stronger connection.


c14.jpg
c15.jpg

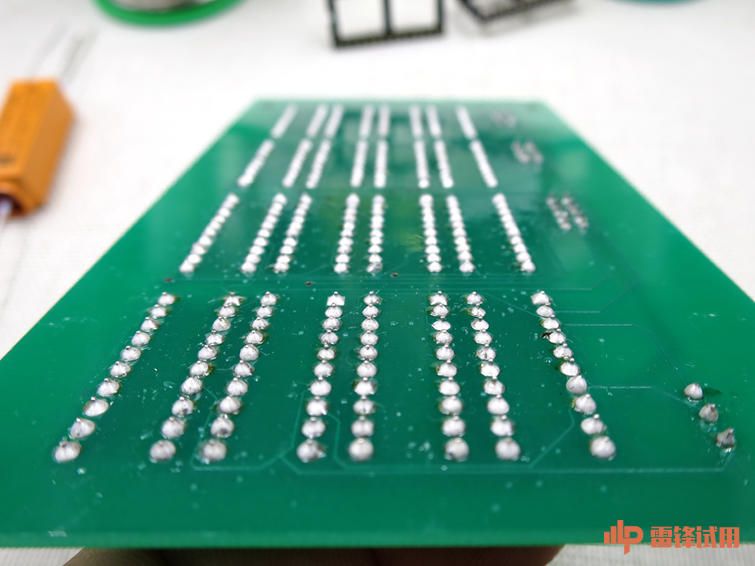
Justover half an hour, I have soldered more than 300 points. This picture shows akind of relay base. The need of the thickness of solder wires is subject toparticular operation. When the distance between the soldered points is closeand the components/parts are relatively small, you need a thin solder wire. Onthe other hand, if the soldered points are relatively large and there is alarger demand of the quantity of melted solder, you need a thick solder wire.As can be seen from the soldered points when the soldering work is done, theymight not be perfect, but the quantity and the shape of melted solder betweensoldered points are desirable. There is neither a leak of solder nor a lack ofit. For over half and hour, TS100 has done a great job. It kept a steadytemperature. Even during the standby time, the oxidation of the tip was not soserious.

c16.jpg

c17.jpg


回复

使用道具 举报

195

主题

1333

回帖

3006

积分

管理员

积分
3006

社区居民忠实会员

 楼主| 发表于 2016-1-12 11:38:44 | 显示全部楼层
Conclusion

d1.jpg

After a few days of trying the TS100mini-soldering iron, I was impressed by its performance. Now I have got used toholding a thin handle in operation. Generally, thanks to TS100’s flexibilityand stability, it does improve at a certain degree the work efficiency. But theproduct itself still has room for improvement. For example, the connectionbetween the end of the soldering iron and the power adaptor poses a securitythreat during operation in which an accidental disconnection is possible out ofan inevitable pull. So I suggest adding a lock to strengthen the safety duringoperation. In addition, the accessory bag fails to include a stand for thesoldering iron. If the soldering iron needs a rest during operation, it wouldbe inconvenient to alternate between power-on and power-off mode. So it isbetter to prepare a suitable stand.
回复

使用道具 举报

您需要登录后才可以回帖 登录 | 立即注册

本版积分规则

Archiver|手机版|MINIWARE产品技术交流 迷你工具-智能烙铁-加热平台-示波器-体感电动螺丝刀-数字电源-智能镊子 ( 粤ICP备07030012号-1 )

GMT+8, 2024-9-17 03:42 , Processed in 1.142861 second(s), 25 queries .

Powered by Discuz! X3.5

© 2001-2024 Discuz! Team.

快速回复 返回顶部 返回列表